This time, I would like to introduce the recommended features of Forex Tester, including various settings and usage tips, to make backtesting and analysis more efficient for FX traders, who spend most of their time on these tasks.
As an FX trader for over ten years, I still find backtesting tedious ( ˆ꒳ˆ; ). However, the longer your trading history, the more you realize the importance and significance of testing your trading strategies. Therefore, I will focus on introducing some lesser-known but highly effective features of Forex Tester for backtesting and analysis.
So, let’s dive in!
記事の目次
- 1 Setting a ‘Start Date’ Separate from the Test Period
- 2 With MetaTrader (MT4,5), You Can’t Go Back to Analyze Important Lower Time Frame Movements
- 3 Setting Shortcut Keys Enhances Efficiency and Allows Focused Testing and Analysis
- 4 One-Click Trading Feature Reduces Time for Scalping Backtesting
- 5 Summary of Recommended Lesser-Known Features in Forex Tester
Setting a ‘Start Date’ Separate from the Test Period
One convenient feature is the ability to set a ‘test start date’ separate from the test period when creating a new project for testing. While you can set a ‘test period’ as the data period to be used for the test, you can also set a ‘test start time.’
For example, if you plan to backtest using past data from January 1, 2010, to December 31, 2015, you might find that you can’t analyze the chart immediately if there’s no data before January 1, 2010. As a result, you end up fast-forwarding through a significant period, which is a waste of time.
To eliminate this wasted time, you can set a ‘test start time.’ This feature allows you to jump directly to the period you want to start your analysis, saving valuable time and making your backtesting process more efficient.
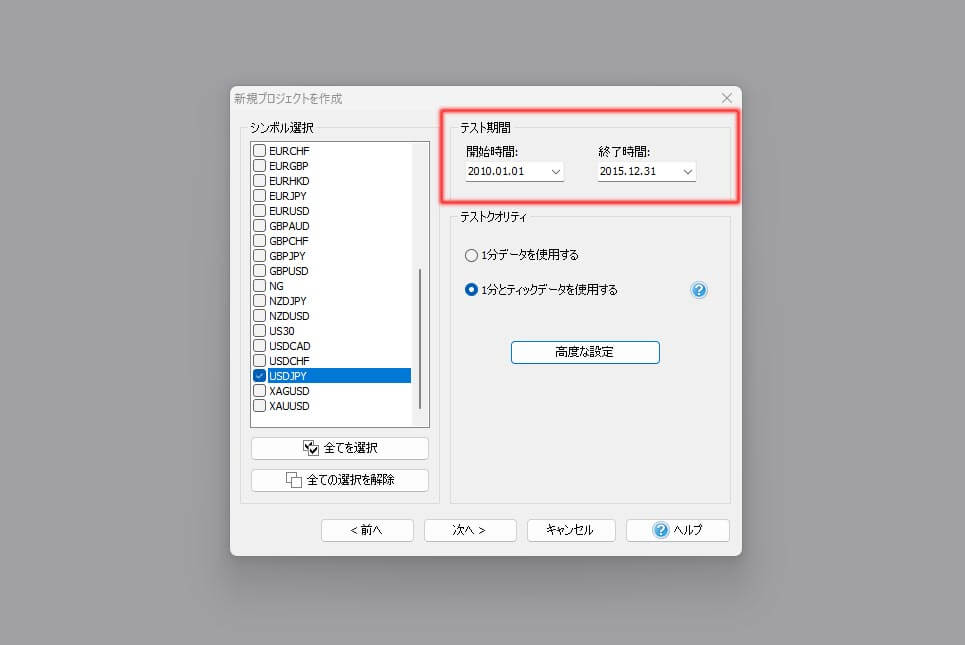
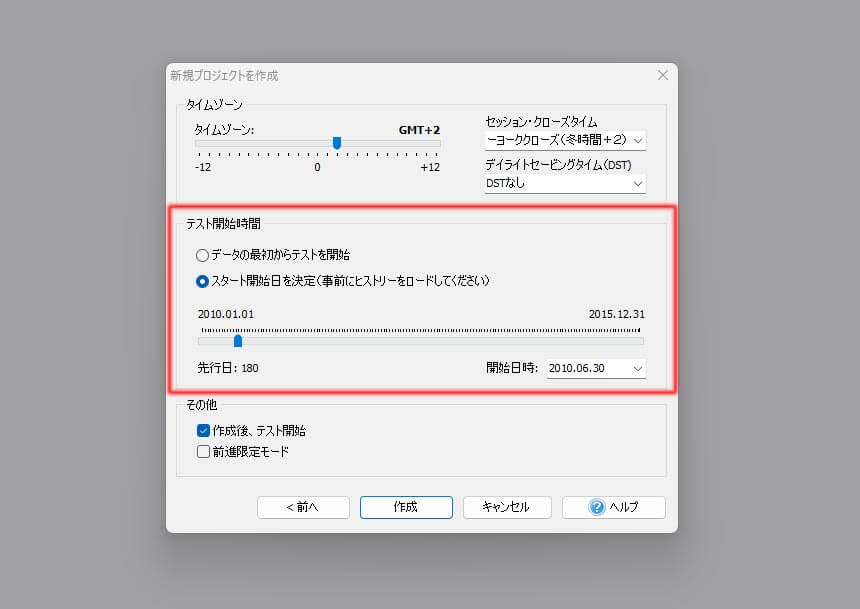
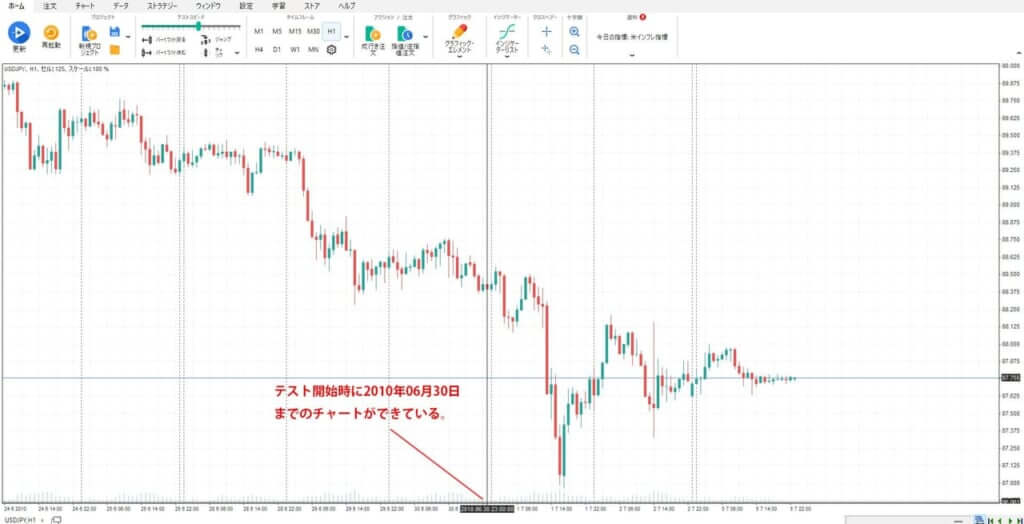
Thanks to this feature, I can immediately start backtesting whenever I feel like it, instead of putting it off because it usually feels too tedious.
With MetaTrader (MT4,5), You Can’t Go Back to Analyze Important Lower Time Frame Movements
This principle is the same as multi-time frame analysis (MF), which is a staple of market analysis. For instance, let’s say you’re looking at a past chart and identify a certain pattern or trend. Whether it’s on the daily chart, 4-hour chart, or 1-hour chart, the process of incorporating it into your trading strategy involves gradually following the price movements from higher time frames to lower time frames.
Depending on the person, if you trade on a daily chart, you might decide to enter a trade based on price
movements on the 30-minute or 1-hour chart. If your main timeframe is the 4-hour chart, you might use the 15-minute to 30-minute chart movements to make your entry decisions.
However, with MetaTrader, the further down you go in the time frames, the shorter the period you can look back on. This limitation means you can’t analyze crucial lower time frame price movements at the time of entry when using the 4-hour or 1-hour charts.
MetaTrader is a great tool for analyzing recent price movements, but to identify patterns in the market and determine whether these patterns are not just a current phenomenon but also appeared in the past, you need several years’ worth of historical data.
In such cases, backtesting tools like Forex Tester allow you to trace market trends down to the 1-minute chart level over several decades. If you download tick data, you can even recreate and practice trading with the exact price movements from several years ago, down to sub-1-minute increments.
Thus, backtesting software is not only useful for past data analysis but also for discovering new trading strategies based on robust historical data.
This is why successful professional traders consistently engage in backtesting. They use backtesting software to stabilize their win rates and discover new strategies.
Setting Shortcut Keys Enhances Efficiency and Allows Focused Testing and Analysis
Setting hotkeys means assigning shortcut keys to various functions in Forex Tester. The setup is simple and can be completed in just two steps:
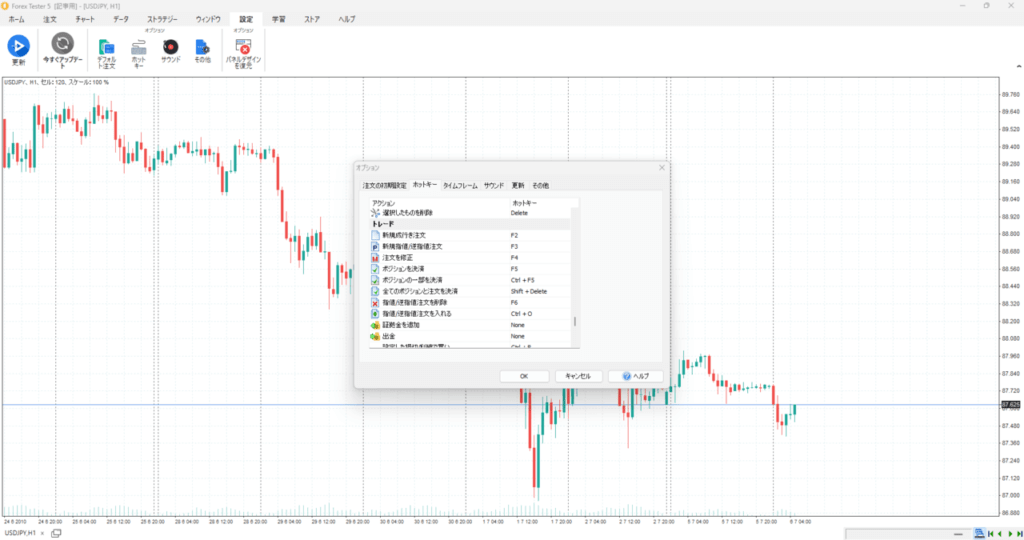
Select “Settings” -> “Hotkeys” from the Forex Tester menu.
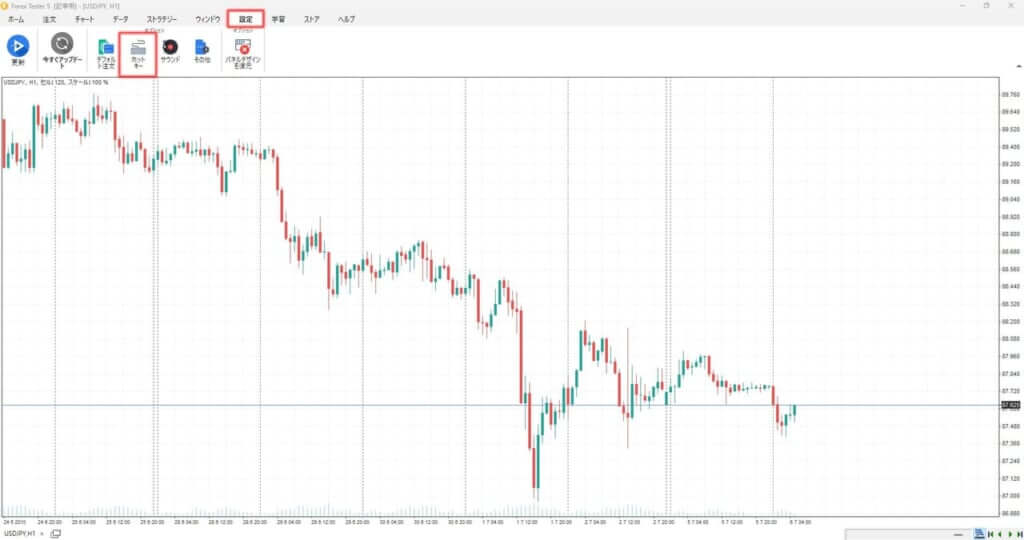
Choose the function you want to assign a shortcut key to from the hotkeys tab in the options and set your preferred key.
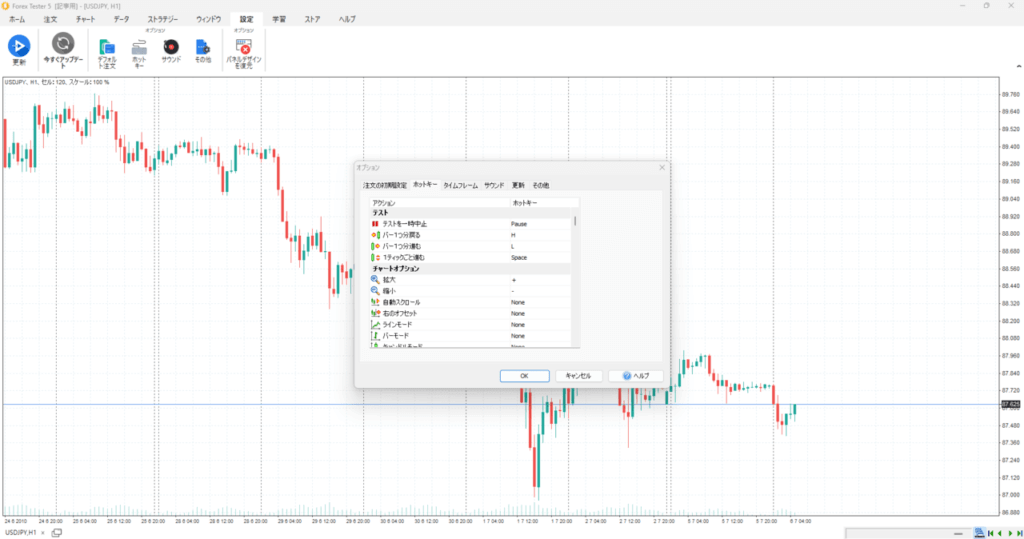
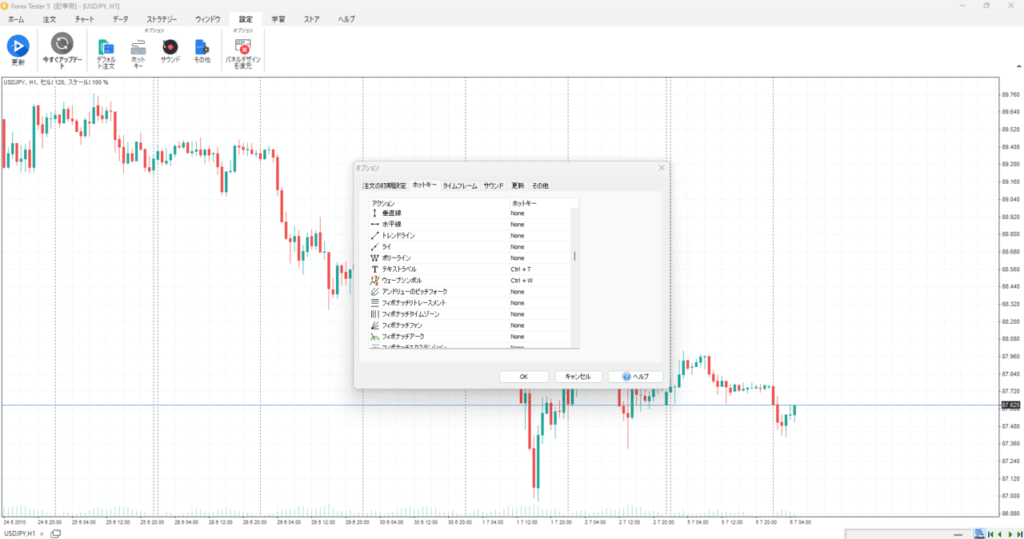
You can set almost any function in Forex Tester to a preferred shortcut key. This feature is surprisingly convenient. Even though you can fast forward and rewind with backtesting software, it’s easy to lose one or two hours testing several years of historical data.
The number of trades or analyses conducted during this time depends on the strategy. However, moving your hand from the keyboard to the mouse and back again for every analysis or trade can be tiring. As a result, you might find the backtesting process tedious.
By assigning hotkeys to essential functions such as opening new positions, activating various lines, and fast-forwarding or rewinding candlesticks, you won’t need to move your hands off the keyboard. This allows you to focus on each price movement and the analysis itself, making the testing process more efficient and significantly more effective.
For those who prefer not to use a keyboard, using a multifunction mouse can enable you to perform testing and analysis using only mouse operations.
One-Click Trading Feature Reduces Time for Scalping Backtesting
What this means is that there are generally two ways to determine stop-loss points and take-profit targets, depending on your trading style and strategy.
First Method: Dynamic Stop-Loss and Take-Profit Points
This method involves adjusting stop-loss and take-profit points for each trade. It’s based on chart patterns, price movements, Fibonacci levels, indicators, etc., and involves setting stop-loss and take-profit levels once certain conditions are met.
- Take profits and cut losses when the double top/bottom neckline is exceeded.
- Take profits and cut losses when below the trend line
- Cut your loss when it exceeds the starting point of Fibonacci, and take profit when it reaches ◯% of Fibonacci
- Stop loss when it falls below the moving average line
The One-Click Trading Feature Shortens Scalping Backtesting Time
The second method involves setting fixed take-profit and stop-loss points based on risk-reward ratios. While the entry conditions differ depending on the strategy, the take-profit and stop-loss points are predetermined at a certain number of pips from the entry price.
For example, take-profit and stop-loss levels might be set at a 1:1 risk-reward ratio or a 1:3 ratio. The exact number of pips can vary depending on the strategy.
- If the risk reward is 1:1, you can cut your loss if it falls 10 pips from the entry price, and take profit if it rises 10 pips.
- In the case of risk reward 1:3, stop loss if it goes down by 10 pips, take profit if it goes up by 30 pips, etc.
Forex Tester’s one-click trading feature is extremely useful when trading with fixed take-profit and stop-loss levels. Personally, I find it particularly effective during the practice and backtesting of scalping trades.
Scalping trading involves making numerous trades on short timeframes like the 1-minute chart to accumulate profits. In this method, traders focus more on the price movements of candlesticks rather than detailed market analysis. Quick decision-making for entries, take-profits, and stop-losses is crucial since a moment’s hesitation or operational error can lead to significant losses.
With Forex Tester’s one-click trading feature, you can preset your take-profit and stop-loss levels. As a result, when you enter a trade, the take-profit and stop-loss settings are automatically applied.
This allows you to concentrate solely on making entry decisions during your trade testing, enhancing efficiency and reducing the chance of errors.
How to Set Up and Use the One-Click Trading Feature in Forex Tester
The setup process is simple.
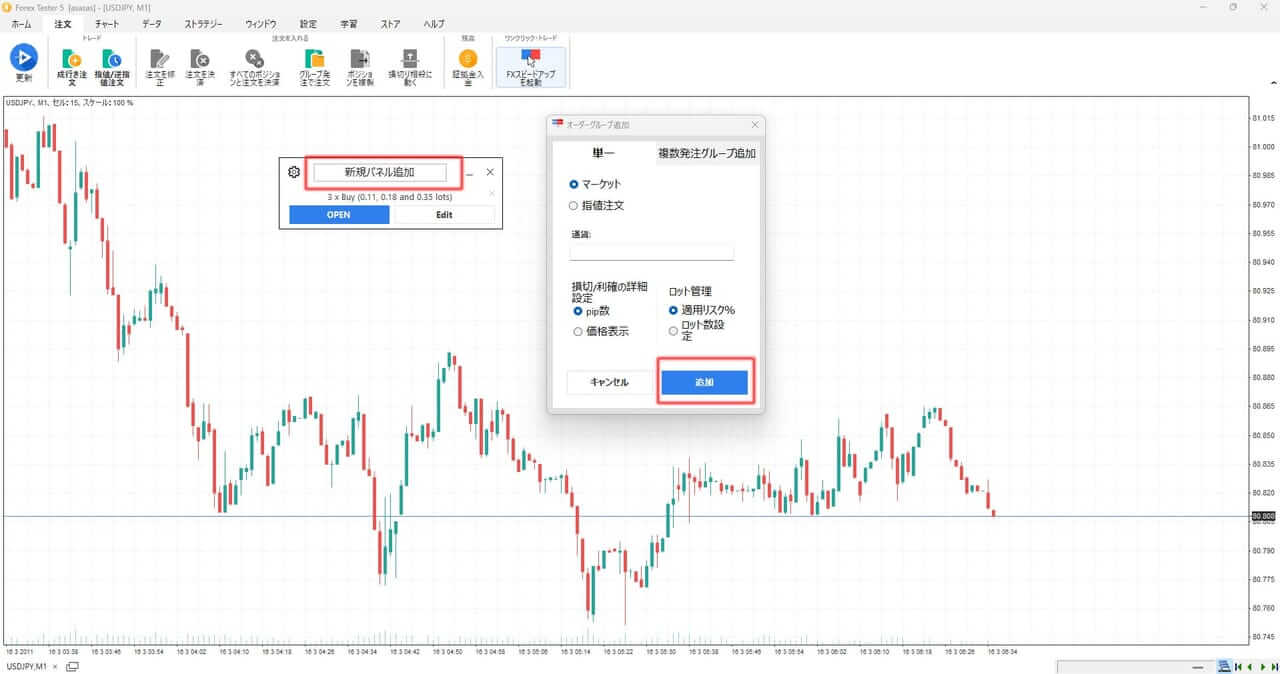
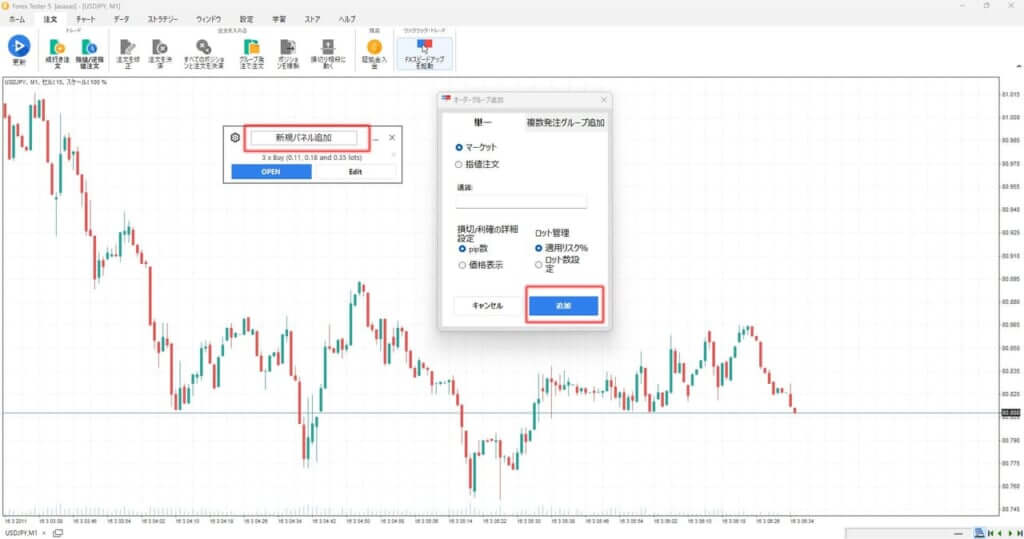
From the Forex Tester menu, select the “Orders” tab and click “Activate FX Speed Up” to display the one-click trading feature panel.
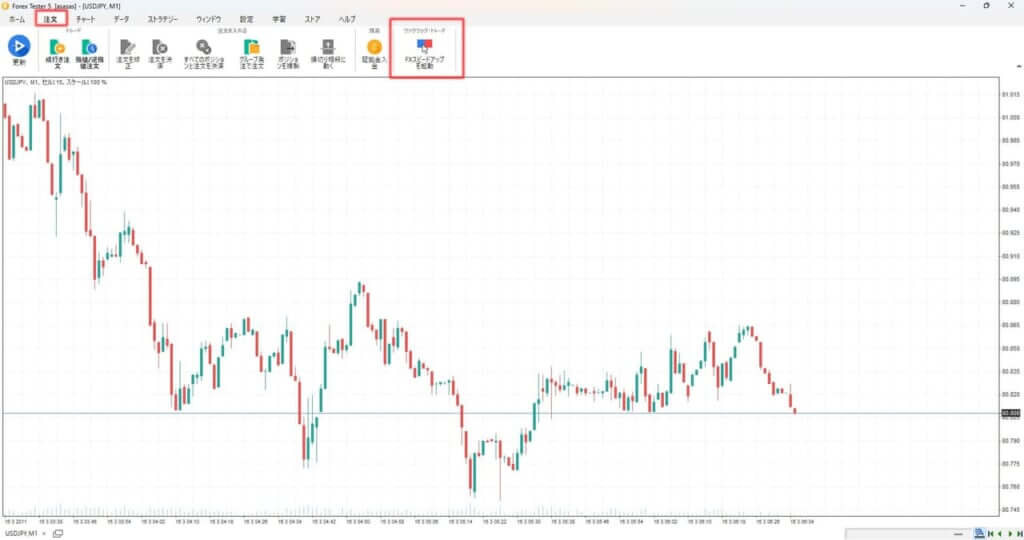
On the displayed panel, click “Add New Panel” to add an order group.
The default settings for the order group are fine as they are.
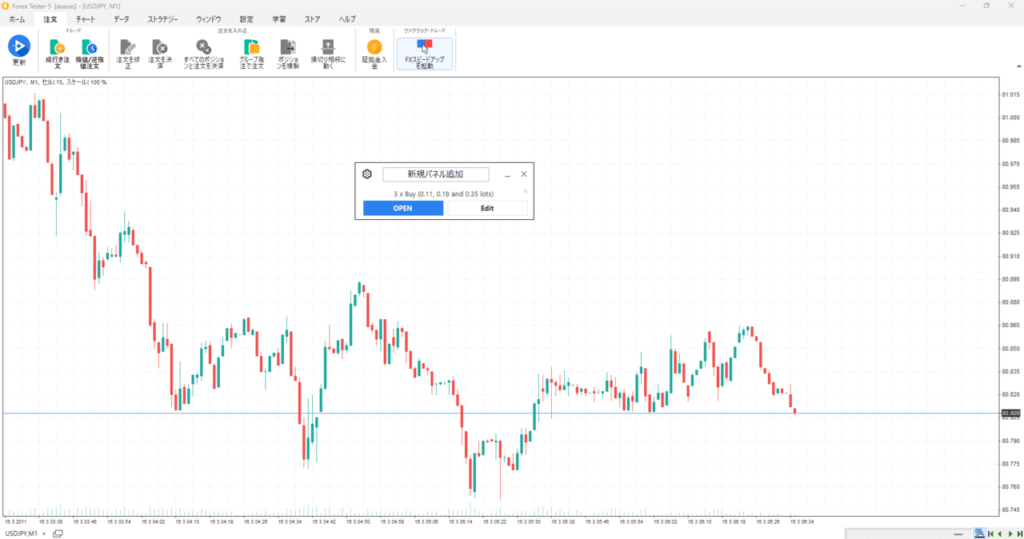
Once you add a new panel (order group), you only need to set the stop-loss and take-profit levels for one-click trading.
In the example image, the stop-loss is set to 100 pips and the take-profit to 150 pips, giving a risk-reward ratio of 1:1.5.
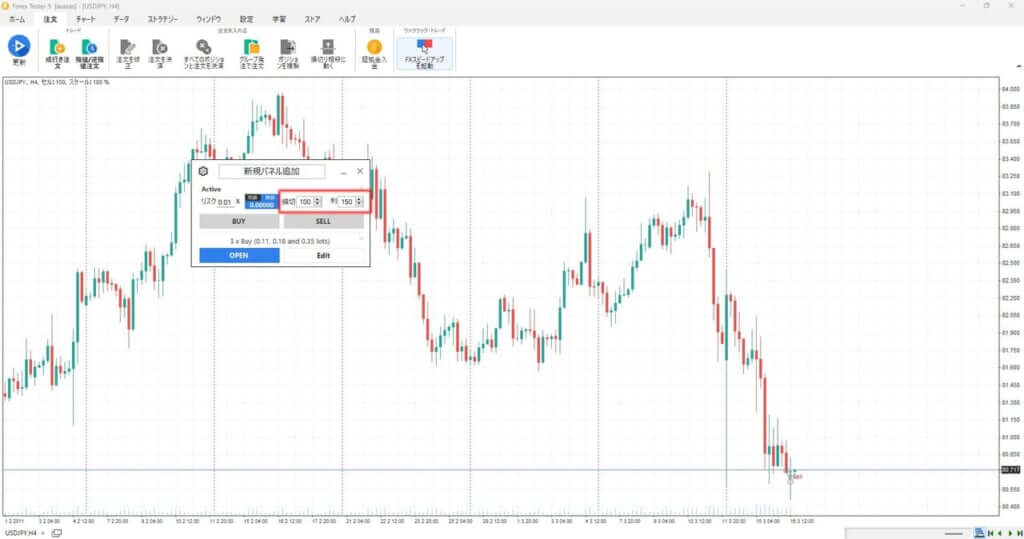
After completing these settings, simply click BUY (buy) or SELL (sell) during your backtesting at your preferred timing. The entry, stop-loss, and take-profit settings will be automatically applied.
The image shows a BUY entry immediately after setting it up as a test.

Summary of Recommended Lesser-Known Features in Forex Tester
Using the features and methods introduced here will not only sharpen your everyday trading skills but also help you discover new strategies and broaden your analysis.
There are still many more convenient features in Forex Tester, and I plan to introduce them in future updates or separate articles as I find the time.
Compared to other backtesting software, Forex Tester excels not only in ease of use but also in functionality. Additionally, it offers highly precise historical data.
Even without using the features introduced here, Forex Tester remains an overwhelmingly convenient and reliable backtesting software. If you haven’t tried it yet or are unsure about purchasing, I highly recommend starting with the free version.
23 Years of Actual Historical Data
Tick Data for Timeframes Below 1 Minute
Comprehensive Support System
For those who have upgraded from the free version to the paid version, I also share a method to get the fees waived after the first month. Be sure to check it out!

の使い方を分析してみたら勝率56.7のトレード手法が見つかった-150x150.jpg)